If you’re reading this, there’s a good chance a recent hailstorm or the memory of your last roof replacement pushed you to start researching metal roofing. That’s smart. Understanding exactly how metal roof installation works before you hire a contractor puts you in a much better position to ask the right questions, spot a quality crew, and avoid costly mistakes.
Here’s the thing: most online guides about metal roof installation were written with generic homeowners in mind. They skip the details that actually matter in Oklahoma City the panel gauge decisions, the storm-specific installation choices, the flashing details that mean the difference between a 50-year roof and a leaking mess three years in.
This guide covers all of it, step by step. By the end, you’ll know exactly what a professional metal roof installation looks like, what to watch for, and how to make the best decision for your home in Edmond, Moore, Yukon, Midwest City, Norman, or anywhere across the OKC metro.
Why Oklahoma City Homeowners Are Choosing Metal Roofs Before Storm Season
Central Oklahoma is not a forgiving environment for roofing materials. Warm, humid air pushing up from the Gulf of Mexico collides with cold upper-level systems rolling down from the Rockies and the result is some of the most intense severe weather in the country. Spring storm season runs April through June, but significant hail events have hit the metro well outside those months.
In our experience working with Oklahoma homeowners, the pattern is consistent: people switch to metal after their second or third shingle replacement. Asphalt shingles may carry 25-year warranties, but the average lifespan of a shingle roof in Oklahoma is dramatically shorter than that when you factor in repeated hail impacts, high UV exposure, and temperature swings that go from single digits in winter to over 100°F in summer.
Metal roofing specifically Class 4 impact-rated systems is built for exactly this environment. Once you understand how a metal roof is installed, you’ll see why it performs so differently than asphalt when the next severe storm rolls through Moore or Midwest City.
What Happens Before the First Panel Goes On Pre-Installation Planning
Most homeowners picture a crew showing up and immediately starting to nail things down. The reality is that a significant portion of a quality metal roof installation happens before a single panel touches your roof deck. Skipping or rushing this phase is where problems start.
Structural Assessment and Permit Requirements
A reputable contractor’s first step is a thorough inspection of your existing roof structure. They’re looking at the decking condition, checking for soft spots or rot, assessing whether the rafters and framing can support the new system, and identifying any pre-existing moisture intrusion that needs to be addressed before new material goes on.
Oklahoma City and surrounding municipalities including Edmond, Norman, Moore, and Midwest City require building permits for full metal roof replacements. Your contractor should handle permit acquisition. If a contractor wants to skip the permit to “save you time,” that’s a serious warning sign. Permitted work protects you during future insurance claims and property sales.
Accurate Measurement and Material Ordering
Roofing materials are ordered by the “square” one square equals 100 square feet of roof coverage. A professional measurement accounts for every slope, hip, valley, and roof section. Standard practice is to order 10% overage to account for cuts and waste.
Here’s something most homeowners don’t realize: standing seam metal panels are often custom-fabricated to the exact length of your roof slope. That eliminates horizontal seams (fewer potential leak points) but it also means panels may arrive on a flatbed truck and require a week or more of lead time. Plan your project timeline accordingly, especially if you’re trying to get ahead of storm season.
Choosing Between Standing Seam and Exposed Fastener Systems
This is the single most important decision in your metal roofing project, and it directly affects how your roof performs in Oklahoma’s storm environment.
- Standing seam panels connect through a concealed mechanical seam no screws penetrating the panel face. Raised seams handle wind-driven rain better, and there are no fastener penetrations for hail impacts to stress or water to infiltrate. This is the premium option and the one we consistently recommend for OKC storm exposure.
- Exposed fastener systems (corrugated panels, PBR panels) cost less upfront and install faster. Screws penetrate the panel face with neoprene-washer seals. They perform well when installed correctly but require periodic inspection and re-torquing, especially after significant hail events.
OKC-specific guidance: For central Oklahoma’s storm exposure, 24-gauge steel panels are the recommended minimum. 29-gauge panels are thinner, cost less, but show more visible cosmetic denting after golf ball–sized hail a common occurrence in the metro area. Homeowners who chose lighter-gauge panels to save money upfront often reconsider after their first significant hail event.
Step 1 Removing the Old Roof (Or Installing Over It)
One of the first questions homeowners ask: can the new metal roof go over the existing shingles? Sometimes yes but it’s not always the right choice.
Many Oklahoma City jurisdictions allow metal-over-shingles installation if you’re currently at only one layer of roofing material. The appeal is obvious: no tear-off means lower labor cost, less disruption, and no disposal fees. But here’s the honest contractor perspective installing over existing shingles hides the deck. If there’s rotted plywood, damaged sheathing, or compressed insulation underneath, you won’t find out until moisture finds a way in, and by then it’s a much larger problem.
Full tear-off exposes the entire deck surface. Every damaged board gets replaced before anything new goes on. It’s the cleaner, longer-lasting foundation and it’s what we recommend whenever there’s any question about the deck’s condition.
During tear-off, a professional crew removes existing shingles, underlayment, and vents, then inspects every square foot of decking. Ask your contractor specifically what they do with damaged boards replacement should be included in a written scope of work, not an unexpected add-on charge mid-project. Before the crew leaves each day, ask about magnetic nail sweeping of the yard and driveway. It matters.
Step 2 Preparing the Roof Deck and Installing Underlayment
The underlayment is one of the most underappreciated components of a metal roof system. It sits between your roof deck and the metal panels, and it does several important jobs: it’s your secondary moisture barrier if any water ever gets past the panel, it reduces condensation on the underside of metal panels, it provides a thermal break, and it helps with sound attenuation during rain.
There are three primary underlayment options your contractor should discuss with you:
- Felt underlayment (15 lb or 30 lb): Traditional, lower cost, and adequate for straightforward applications. It’s less tear-resistant and doesn’t handle temperature extremes as well as synthetic options.
- Synthetic underlayment: Lighter, more durable, and significantly more resistant to the temperature swings Oklahoma puts roofs through. This is what most quality installers use today.
- Self-adhering ice-and-water membrane: The premium option for valleys, eave edges, and around all penetrations. This peel-and-stick membrane creates a fully bonded seal that won’t shift or wrinkle. In Oklahoma’s climate with wide temperature swings causing significant thermal expansion and contraction in metal panels a quality self-adhering membrane in critical areas is worth the added cost.
Underlayment Installation Best Practices
The underlayment is rolled out horizontally, starting at the eave and working up toward the ridge. Each course overlaps the one below it by 6–8 inches. The critical detail here is keeping the material flat and wrinkle-free any wrinkles or bubbles will telegraph through to the finished panel surface and can create stress points over time.
The adhesive backing is removed in sections as you unroll, keeping the material tight to the deck. Once a course is rolled out, it’s cut flush at the rake edges. For a roof with multiple penetrations chimneys, skylights, vents each one gets individually flashed with additional membrane pieces before the main deck underlayment is complete.
Step 3 Installing Drip Edge, Eave Trim, and Flashing
This is the phase that separates a basic installation from a professional one. Flashing and trim work is tedious, time-consuming, and critically important. It’s also where corner-cutting contractors take shortcuts that cause leaks years later.
The drip edge is a metal strip installed along every eave. It does exactly what the name implies it directs water off the panel edge and away from the fascia board and foundation below. Without a properly installed drip edge, water wicks back under the panel edge and starts deteriorating the fascia and soffit.
Eave trim is installed over the underlayment in Oklahoma’s climate. This matters because wind-driven rain a constant reality during OKC’s storm season can force water horizontally under panel edges at surprisingly low wind speeds. Proper eave trim installation stops that infiltration path entirely.
Flashing at Every Penetration The Highest-Risk Areas
Here’s where the real expertise shows: every point where the roof surface meets a vertical wall, chimney, vent pipe, skylight, or valley requires custom flashing. These are the highest-risk leak locations on any roofing system and metal roofing is no different.
Professional flashing installation means metal flashing pieces cut and bent to fit each specific penetration, butyl tape sealant applied behind the flashing before fastening, and additional sealant at all edges and overlaps. The butyl tape creates a flexible, long-lasting seal that maintains contact even as the metal expands and contracts through Oklahoma temperature cycles.
Common mistake: Using incompatible caulk products on metal roofing. Some caulks degrade rapidly under Oklahoma’s high UV load and temperature swings, shrinking away from contact within a few seasons. Ask your contractor specifically which sealant products they use and confirm they’re rated for metal roofing applications.
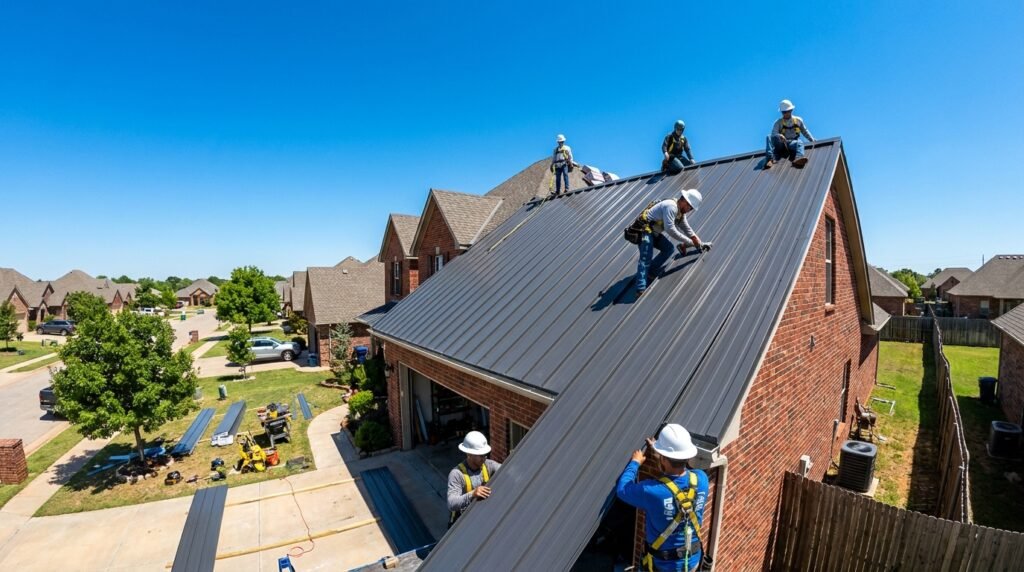
Step 4 Panel Layout, Alignment, and Installation
This is the phase most homeowners picture when they think of metal roof installation panels going on the roof. It’s important work, but by the time you reach this step, all the foundational decisions have already been made. A skilled crew makes this phase look straightforward. That’s because the preparation was done right.
Establishing a Square Reference Line
Before the first panel goes down, installers establish a precise reference line using the 3-4-5 method to create a 90-degree angle from the eave. This guarantees panels run perfectly parallel to each other across the full roof length. On a large roof, even a small misalignment at the start compounds dramatically by the time you reach the ridge.
The starting point which edge of the roof the first panel goes on is chosen based on prevailing wind direction. In Oklahoma City, where storms typically approach from the southwest, panels start on the east or northeast edge so overlaps face away from the primary wind direction. This keeps wind-driven rain from finding its way into panel seams.
Installing Panels Bottom to Ridge
Panels are installed one at a time, working from the eave upward toward the ridge. The first panel is aligned precisely with the drip edge, checked for square, and temporarily held in position before final fastening. Every subsequent panel overlaps the previous one the overlap direction always facing away from prevailing wind.
For standing seam systems, panels are mechanically seamed or clipped together through the raised seam profile. No fasteners penetrate the panel face. This is why standing seam performs better in Oklahoma’s wind-driven hail environment there are simply fewer vulnerable points on the panel surface.
For exposed fastener systems, screws are driven through the panel flat at each rib location. The fastener pattern matters screws placed too far apart allow panel flex under wind uplift, while too many screws in the wrong locations can restrict thermal movement and cause oil-canning (a waviness in the panel surface).
Fastener Torque The Detail That Determines Longevity
Between you and me, this is where a lot of DIY and lower-quality installations fail. The correct fastener torque is specific: tight enough to compress the neoprene washer flat to the edge of the screw head not past it. Under-tightened screws leave a gap under the washer that water finds immediately. Over-tightened screws deform the gasket, pushing the rubber past its sealing contact point.
An experienced crew develops a feel for this quickly. But it’s worth asking any contractor you interview how they train their crews on fastener torque and whether they do a final inspection pass specifically checking fastener seating before moving on.
One more detail that separates professional crews from careless ones: metal shavings. Every cut generates metal shavings and burrs that land on the panel surface and in the gutters. These must be swept off immediately not at end of day, immediately. Left on the surface, they begin oxidizing within days in Oklahoma’s humid spring weather, creating rust stains that are nearly impossible to remove without damaging the panel coating.
Step 5 Ridge Cap, Gable Trim, and Final Sealing
The ridge cap seals the highest point of the roof the peak where two opposing slopes meet. It’s a critical wind-uplift vulnerability. When straight-line winds at 60 to 80 mph (a regular occurrence in OKC thunderstorms) hit a roof, they create suction pressure at edges and ridge points. A properly installed ridge cap, fastened at the correct intervals with butyl tape underneath, resists that uplift far better than the alternatives.
Most quality metal roof installations use a vented ridge cap a ridge cap design that allows airflow from the attic to escape at the peak. Paired with soffit vents, this creates a complete ventilation loop: cool air enters at the soffits, travels through the attic, and exits at the ridge. In Oklahoma’s brutal summer heat, proper attic ventilation significantly reduces cooling load and protects both the roof structure and the panel coating from heat-related degradation.
Gable trim caps the exposed rake edges on each end of the roof. It’s installed with butyl tape between the trim underside and the panel surface, then fastened at 12-inch intervals. At each corner where gable trim meets eave trim, the pieces are mitered and sealed another area where workmanship quality is visible. Sloppy cuts, gaps, or missing sealant at trim corners are reliable indicators of how the rest of the installation went.
The final walk-through includes checking every fastener for correct seating, inspecting all sealant joints around penetrations, verifying ridge cap and trim alignment, and doing a complete sweep with a magnetic nail sweeper. If your contractor skips the magnetic sweep, you’ll find nails in your driveway and lawn for months.
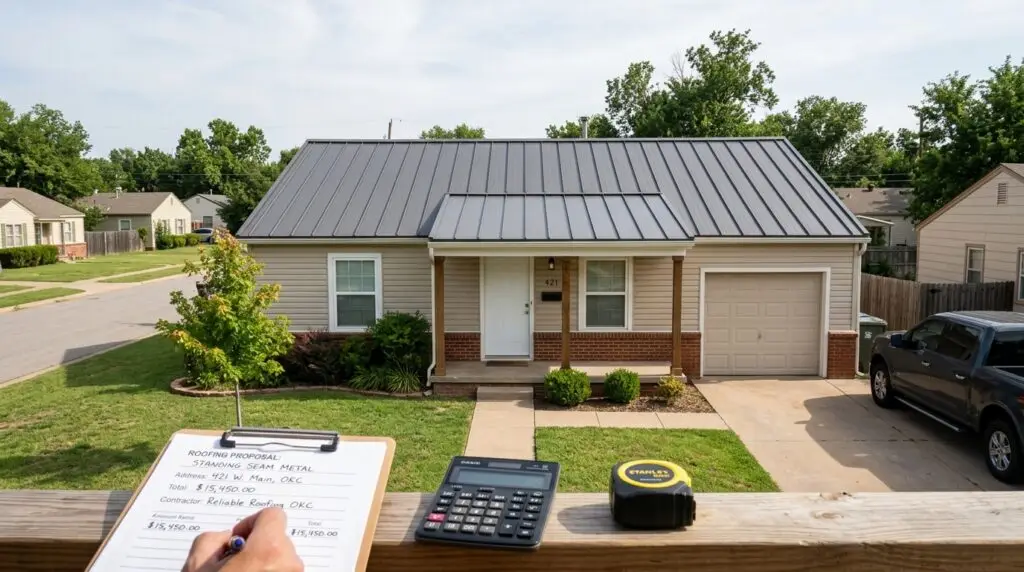
What Metal Roof Installation Costs in Oklahoma City Honest Ranges
It depends on several factors and anyone who gives you a firm price without measuring your roof and discussing your material options is guessing. That said, there are legitimate variables every OKC homeowner should understand before getting quotes.
Panel system is the biggest cost driver. Standing seam systems carry a higher installed cost per square than exposed fastener systems, but they offer better storm performance, lower long-term maintenance cost, and longer service life. For a home in a hail-heavy corridor like south OKC, Moore, or Yukon, the performance difference over 40 to 50 years often justifies the premium.
Additional variables that affect your project cost:
- Tear-off vs. overlay: Full tear-off adds labor and disposal cost but is often the right choice for deck integrity.
- Roof complexity: Multiple valleys, dormers, chimneys, and skylights require more flashing labor and material.
- Panel gauge: 24-gauge steel costs more than 29-gauge, but performs significantly better in Oklahoma’s hail environment.
- Coating quality: Kynar 500 (PVDF) coatings outperform standard polyester finishes for UV resistance and post-hail impact corrosion resistance in Oklahoma’s climate.
One cost factor most homeowners overlook: insurance premium savings. Many Oklahoma insurance carriers offer meaningful discounts for homes with Class 4 impact-rated metal roofing the highest rating under UL 2218 impact testing. Confirm the specific discount with your carrier before choosing your panel system. If you’re already replacing a storm-damaged roof, upgrading to a Class 4 rated system may offset a significant portion of the cost through long-term insurance savings.
Ask any contractor you interview to provide a written, itemized estimate not a single line-item price. A detailed scope of work protects you and is the sign of a contractor who knows exactly what the job requires.
Oklahoma City Storm Considerations How Installation Decisions Affect Real-World Performance
This section is where Oklahoma homeowners need information that no national roofing guide can provide. OKC’s storm environment is genuinely different and those differences change which installation decisions matter most.
Most people picture hail falling straight down. In Oklahoma, that’s rarely what happens. The rotational dynamics and high winds in OKC’s supercell thunderstorms produce hail that falls at steep, sometimes nearly horizontal angles. That changes everything about where your roof is vulnerable. Angled hail concentrates impact force on seam joints, panel edges, flashing edges, and fastener locations the highest-stress points on any metal roofing system.
Standing seam panels handle this better than exposed fastener systems precisely because the mechanical attachment points are hidden inside the seam. There are no screw heads on the panel face for wind-driven hail to impact. But no system is completely immune to what Oklahoma wind can do.
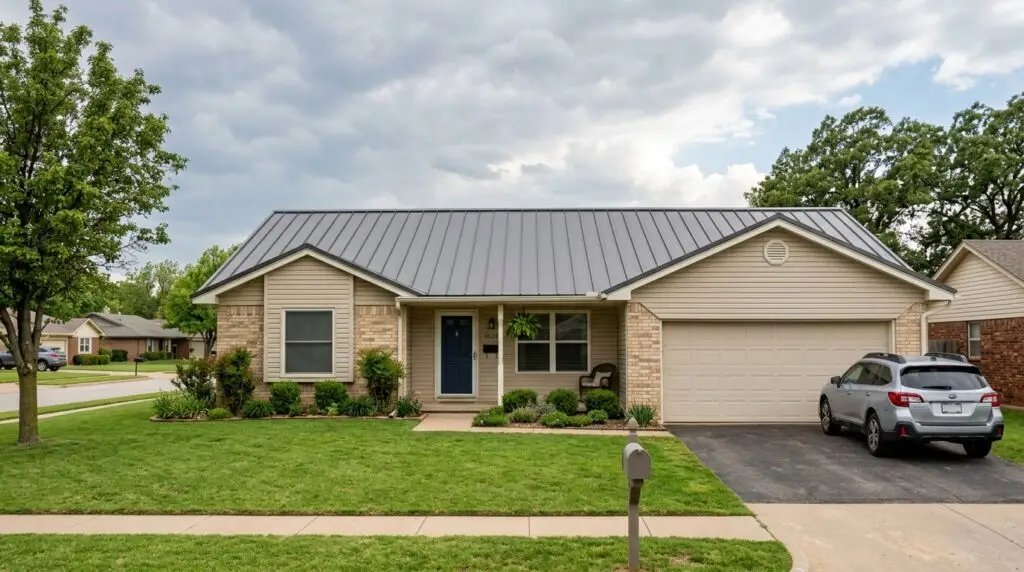
Communities south of Oklahoma City particularly Moore have experienced some of the most concentrated severe weather activity in the region’s recorded history. Homeowners in those areas, especially those on flatter-pitched ranch-style homes, face greater hail exposure due to the shallow roof angle. For those properties, heavier panel gauge and a more aggressive fastener pattern at the eave are worth discussing with your installer.
The FORTIFIED Roof™ standard, developed by the Insurance Institute for Business and Home Safety (IBHS), is a voluntary construction standard specifically designed to address wind uplift and hail resistance. Oklahoma’s own insurance department actively promotes FORTIFIED certification. Some OKC area carriers offer additional premium discounts for homes that achieve FORTIFIED designation worth investigating before your project scope is finalized.
Post-storm inspection protocol matters too. After any significant storm, check your gutters, HVAC unit fins, aluminum window trim, and vent covers before you try to assess your roof. These soft-metal surfaces dent far more easily than your roof panels. If they show heavy marking from a storm, the event was significant enough to warrant a professional metal roof inspection.
Common Metal Roof Installation Mistakes And How to Avoid Them
In our experience, most metal roofing problems that show up years after installation trace back to one of these mistakes. Knowing them helps you evaluate contractors before the work begins, not after.
- 29-gauge may clear minimum code requirements, but it’s inadequate for Oklahoma City’s regular golf ball-sized hail events. Don’t let cost be the only consideration here. Wrong panel gauge for local conditions:
- Rotted or damaged deck boards under old shingles are a common discovery mid-project. A quality contractor identifies and prices this work upfront not as a mid-project surprise. Skipping the structural assessment:
- The single most common source of early leaks in exposed fastener systems. Both under-tightened and over-tightened screws eventually fail. correct fastener torque:
- Some caulk products degrade rapidly under Oklahoma’s UV exposure and temperature extremes. Confirm your contractor uses metal-rated sealants throughout. Incompatible sealants:
- Shavings left on the panel surface or in gutters after cutting create rust staining within weeks in Oklahoma’s spring humidity. No metal shaving cleanup:
- After every major OKC hailstorm, out-of-state contractors appear door-to-door. Many don’t carry valid Oklahoma licenses, and most are gone before warranty issues arise. Always verify licensure with the Oklahoma Construction Industries Board before signing anything. Hiring unlicensed storm chasers:
How Long Does Metal Roof Installation Take in Oklahoma City?
For a standard residential gable roof of average size and complexity, most metal roof installations take 1 to 3 days from start to finish. A larger home, a roof with multiple valleys, dormers, skylights, or chimneys, or a standing seam system with more complex mechanical seaming may run 3 to 5 days.
What often catches homeowners off guard is the material lead time. Custom-fabricated standing seam panels the type cut to your roof’s exact slope length may take 1 to 2 weeks from order to delivery. If you’re working to get your project done before Oklahoma’s spring storm season, factor that lead time into your planning. A contractor who can start next week but can’t get materials for 10 days isn’t actually starting next week.
Weather delays are a normal part of doing business in Oklahoma. No professional crew installs metal roofing in wet or high-wind conditions wet metal is dangerously slippery, and wind makes panel handling unsafe and imprecise. A reputable contractor builds schedule flexibility into the project from the start.
Frequently Asked Questions About Metal Roof Installation in Oklahoma City
Can metal roofing be installed over existing shingles in Oklahoma City?
Yes, in many cases if you’re currently at one layer of roofing material and the deck is structurally sound. However, installing over shingles hides potential deck damage and can complicate future insurance claims. A professional contractor should inspect the existing deck condition before recommending overlay versus full tear-off.
What is the best type of metal roof for Oklahoma City weather?
Standing seam metal roofing with 24-gauge steel and a Kynar 500 (PVDF) coating performs best in OKC’s storm environment. Concealed fasteners mean fewer vulnerable penetration points, and heavier-gauge panels resist cosmetic hail denting significantly better than 29-gauge alternatives.
How long does metal roof installation take?
Most residential installations take 1 to 3 days for standard rooflines. Complex roofs or standing seam systems may take 3 to 5 days. Custom-fabricated panels often require 1 to 2 additional weeks of lead time before installation begins.
Does metal roof installation require a permit in Oklahoma City?
Yes. Full roof replacements in Oklahoma City and surrounding municipalities including Edmond, Norman, Moore, and Midwest City require a building permit. A licensed contractor should handle permit acquisition as part of the project scope.
Will a metal roof lower my homeowner’s insurance in Oklahoma?
Many Oklahoma insurance carriers offer premium discounts for Class 4 impact-rated metal roofing. The discount range varies by carrier and policy. Confirm the specifics with your insurance agent before finalizing your panel system selection the long-term savings can meaningfully offset the upfront upgrade cost.
What is the difference between standing seam and exposed fastener metal roofing?
Standing seam panels connect through a concealed mechanical seam with no exposed fasteners on the panel face better wind and hail resistance, lower long-term maintenance. Exposed fastener systems cost less upfront but have screws penetrating the panel surface that require periodic inspection and re-torquing, especially after Oklahoma hailstorms.
How do I know if my metal roof was installed correctly?
Signs of a quality installation include: panels running true and square from eave to ridge, ridge cap and gable trim sitting flush with no gaps, drip edge and eave trim tight against the fascia, all penetrations fully flashed and sealed, no metal shavings left on the panel surface, and fasteners driven flat at the correct torque not crooked, not over-compressed.